


Next: Simulation Results
Up: Implementation and Documentation
Previous: Minimum Mean Squared Error
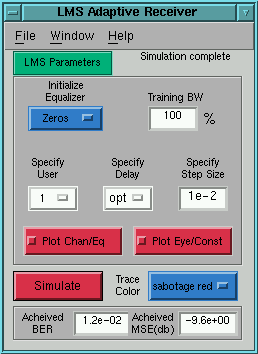
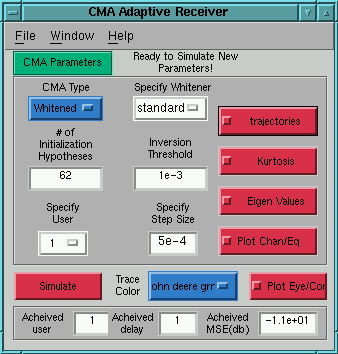
Figure 4.12: (a) LMS Control Window (b) CMA with Minimum Entropy Control Window
Implementing the LMS algorithm requires more initial parameters than
the fixed receivers do. The equalizer/detector must be initialized as
well as the step size and the training bandwidth. All the other
parameters are similar to the fixed detector implementations.
-
 This pulldown menu
offers four different initializations for the detector. Two
of the options are to initialize the equalizer coefficients to all
zeros or ones. Another is to initialize the coefficients to
the MMSE solution. The last is to initialize the coefficients
to a perturbation of the MMSE solution, listed as Random in
the menu.
This pulldown menu
offers four different initializations for the detector. Two
of the options are to initialize the equalizer coefficients to all
zeros or ones. Another is to initialize the coefficients to
the MMSE solution. The last is to initialize the coefficients
to a perturbation of the MMSE solution, listed as Random in
the menu.
-
 The training bandwidth can be
set to any value between 0 and 100%. For example, if the
training bandwidth is set to 10%, then 10 out of every 100
symbols transmitted will be used to train the equalizer.
The training bandwidth can be
set to any value between 0 and 100%. For example, if the
training bandwidth is set to 10%, then 10 out of every 100
symbols transmitted will be used to train the equalizer.
-
 The step size can be chosen to any
value, however, convergence of the algorithm is dependent on
the step size, so be cautious.
The step size can be chosen to any
value, however, convergence of the algorithm is dependent on
the step size, so be cautious.
The CMA control window, shown in figure 4.12, is slightly
more complex than the LMS control window. There are more parameters
to set and also more figures that can be displayed. For more info
about minimum entropy initialization of CMA see 3.2.2
-
 This specifies whether or not to run
CMA on the pre-whitened data or the non-pre-whitened data.
This specifies whether or not to run
CMA on the pre-whitened data or the non-pre-whitened data.
-
 There are options for both a standard
whitener and one that is de-biased (Noise term is subtracted
from the eigenvalues).
There are options for both a standard
whitener and one that is de-biased (Noise term is subtracted
from the eigenvalues).
-
 This value determines the
minimum size eigenvalues to invert.
This value determines the
minimum size eigenvalues to invert.
-
 When this box is checked, the tap
trajectories figure is activated when a simulation is
performed. The tap trajectories of the filter are plotted in
an ensemble. The MSE corresponding to each iteration is also
plotted. An example of this is shown in figure
4.13
When this box is checked, the tap
trajectories figure is activated when a simulation is
performed. The tap trajectories of the filter are plotted in
an ensemble. The MSE corresponding to each iteration is also
plotted. An example of this is shown in figure
4.13
-
 When this box is checked, the
Kurtosis figure is activated when a simulation is performed.
The figure plots a value inversely proportional to the
kurtosis for each hypothesis. The plot consists of the
non-pre-whitened and pre-whitened results as well as the noise
power of the individual in-cell users. See figure
4.13 for an example.
When this box is checked, the
Kurtosis figure is activated when a simulation is performed.
The figure plots a value inversely proportional to the
kurtosis for each hypothesis. The plot consists of the
non-pre-whitened and pre-whitened results as well as the noise
power of the individual in-cell users. See figure
4.13 for an example.
-
 When this box is checked, the
Eigenvalues figure is activated when a simulation is
performed. The Eigenvalue figure displays the eigenvalues of
the Auto-Correlation Matrix, the eigenvalues of the received
signal, and the eigenvalues of the received signal after
whitening. See figure 4.13.
When this box is checked, the
Eigenvalues figure is activated when a simulation is
performed. The Eigenvalue figure displays the eigenvalues of
the Auto-Correlation Matrix, the eigenvalues of the received
signal, and the eigenvalues of the received signal after
whitening. See figure 4.13.
Note: If the figures Kurtosis, Eigenvalues, and Tap Trajectories are
closed, they can only be regenerated by re-simulating.
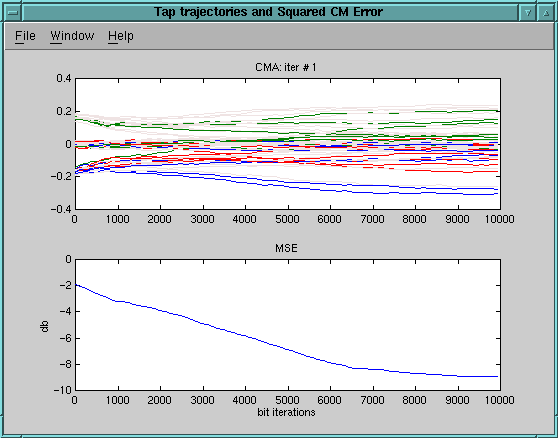

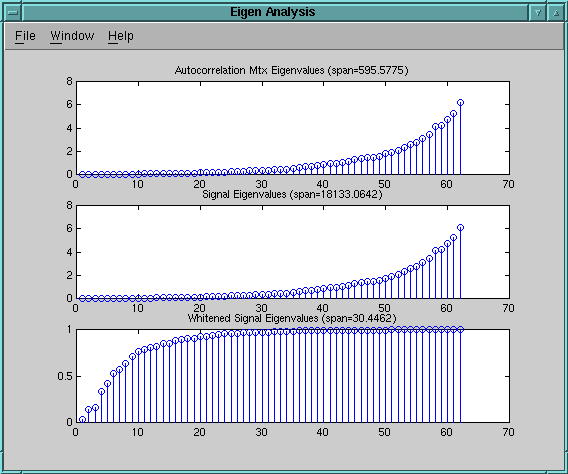
Figure 4.13: (a) Tap Trajectories Figure (b) Kurtosis Figure (c) Eigen
Values Figure
Next: Simulation Results
Up: Implementation and Documentation
Previous: Minimum Mean Squared Error
Thu Dec 17 13:13:15 EST 1998